In July 2012, YouTube added a button that did something almost no video site offered: it blurred every face in a video automatically. The idea came from human rights work. The organisation WITNESS had pointed out that people filming protests and abuses could put the people in their footage at risk, and that no video site gave them a way to blur faces. YouTube was honest about the limits from day one: its blog post admitted the tool sometimes missed faces, depending on the angle, the lighting and anything in the way.
Fourteen years on, blurring faces has gone from a specialist job to something ordinary people need every week. A parent posting a school play. A teacher sharing a lesson. A shop sending CCTV to the police. A creator filming in a busy street. A company answering a request for footage under data protection law. And the technology has changed completely: what once took an editor hours of keyframing now takes seconds, on a phone.
This guide covers why people blur faces, how it was done before AI, how automatic face blurring arrived, which ways of hiding a face really work (some popular ones don’t), how the tools on the market compare, and a little about how we built our own Blur faces tool, which finds and hides every face in a video without uploading it anywhere.
Why people blur faces
The most common reason is simple courtesy: the people in the background of your video didn’t ask to be in it. But there’s often a legal reason too.
Under the UK and EU GDPR, information about “an identifiable natural person”, someone who can be identified “directly or indirectly”, is personal data (Article 4). A recognisable face in a video is exactly that. The UK’s Information Commissioner’s Office puts it plainly in its guidance on video surveillance: if people can be identified from footage, it’s personal data. When an organisation hands CCTV footage to someone who asks for their own data, the ICO expects the other people in it to be protected, by “blurring, masking, or using a solid fill” to obscure them.
The European Data Protection Board’s guidelines on video devices say much the same: other people in a copy of footage should be anonymised, “for example by blurring”. They add a detail that matters for the rest of this guide. Blurring counts as erasing someone’s data only when there’s no way to recover the original. A blur that can be undone isn’t anonymisation at all.
Not every video is covered. The ICO’s advice for schools gives the example of grandparents filming the nativity play: that’s personal use, and data protection law doesn’t apply. But the moment a school, a club or a business publishes video, it does, and many schools now ask parents not to post other children’s faces online at all. (If you work in a school, we’ve written about video tools for education that never upload anything.)
Journalists have the strictest rules of all. The BBC’s guidance on anonymity covers far more than faces: hair, tattoos, a distinctive walk, a car, a street sign, a voice. It warns about “jigsaw identification”, where small details that each look harmless add up to a name. We’ll come back to that, because it’s the most common mistake people make.
How faces were hidden before AI
Television has been hiding identities for as long as it’s been interviewing people who need protecting. The classic techniques are still in use: filming someone from behind or in silhouette, lighting them so their face is in shadow, shooting through frosted glass, and in the edit, blurring or pixelating the face and revoicing the person with an actor rather than just distorting their voice.
The hard part, until recently, wasn’t the blur. It was making the blur follow a moving face.
After Effects
Adobe’s compositing app has long been the professional’s tool. Its tracker includes Face Tracking: you draw a mask loosely around a face and After Effects follows it, frame by frame, and Adobe lists “blurring a person’s face” as one of the uses. For harder shots, After Effects comes with Mocha AE, a planar tracker from Boris FX that follows a surface even as it turns. In practice, editors track, check, fix the frames where the track slips, and repeat for every face.
Premiere Pro
Adobe’s own tutorial shows the standard method: add a Gaussian blur, draw an ellipse over the face, feather its edge, then track the mask forward and backward. Adobe’s newer Object Mask, still marked beta, uses AI to select and follow a person with a single click, and names “blurring faces for privacy protection” as a use. It’s still one subject at a time, though, not “find every face”.
Final Cut Pro
Apple’s editor got an object tracker in 2021. Drag a blur onto the viewer and Final Cut draws ovals over the faces it can see; drop the blur on one and it follows that face. It’s quick, but you still place every blur yourself.
DaVinci Resolve
Blackmagic’s free editor can blur a tracked window by hand. Its AI selection tool, Magic Mask, is one of the features “found exclusively in DaVinci Resolve Studio”, the paid version, listed at $295.
All of these work, and in skilled hands they give the best possible results on a single shot. The problem is time. When a county sheriff’s office in Nevada asked to charge for copies of body camera footage, it explained that it takes about an hour to redact 10 minutes of footage. That’s six hours for every hour of video, done by people trained for it. For a parent with a two-minute clip of a school concert, it’s out of reach.
How automatic face blurring arrived
Automatic face blurring needs two things: a computer that can find faces, and one that can keep finding them, frame after frame.
The first came in 2001, when Paul Viola and Michael Jones published a face detector that ran at 15 frames a second on an ordinary desktop computer, fast enough for live video.
The first time face blurring ran at a truly enormous scale was Google Street View. Google’s researchers described in 2009 how they blurred faces and number plates across its imagery automatically, and reported that the system blurred more than 89% of faces. That number deserves a second look: it means roughly one face in ten was missed. Street View still lets anyone ask for extra blurring.
YouTube’s button followed in 2012, and it’s still there today, now in the YouTube Studio editor: Face blur finds the faces in a video you’ve already uploaded and lets you pick which to blur.
Then deep learning changed what was possible on small devices. In 2019 Google published BlazeFace, a face detector built for phones that runs hundreds of times a second on a flagship device, and the same year the RetinaFace paper pushed accuracy on difficult, crowded scenes. OpenCV, the open-source computer vision library, now ships YuNet, a tiny and accurate face detector under the permissive MIT licence. And in 2024 Meta released SAM 2, an open model that can follow almost any object through a video once you point at it.
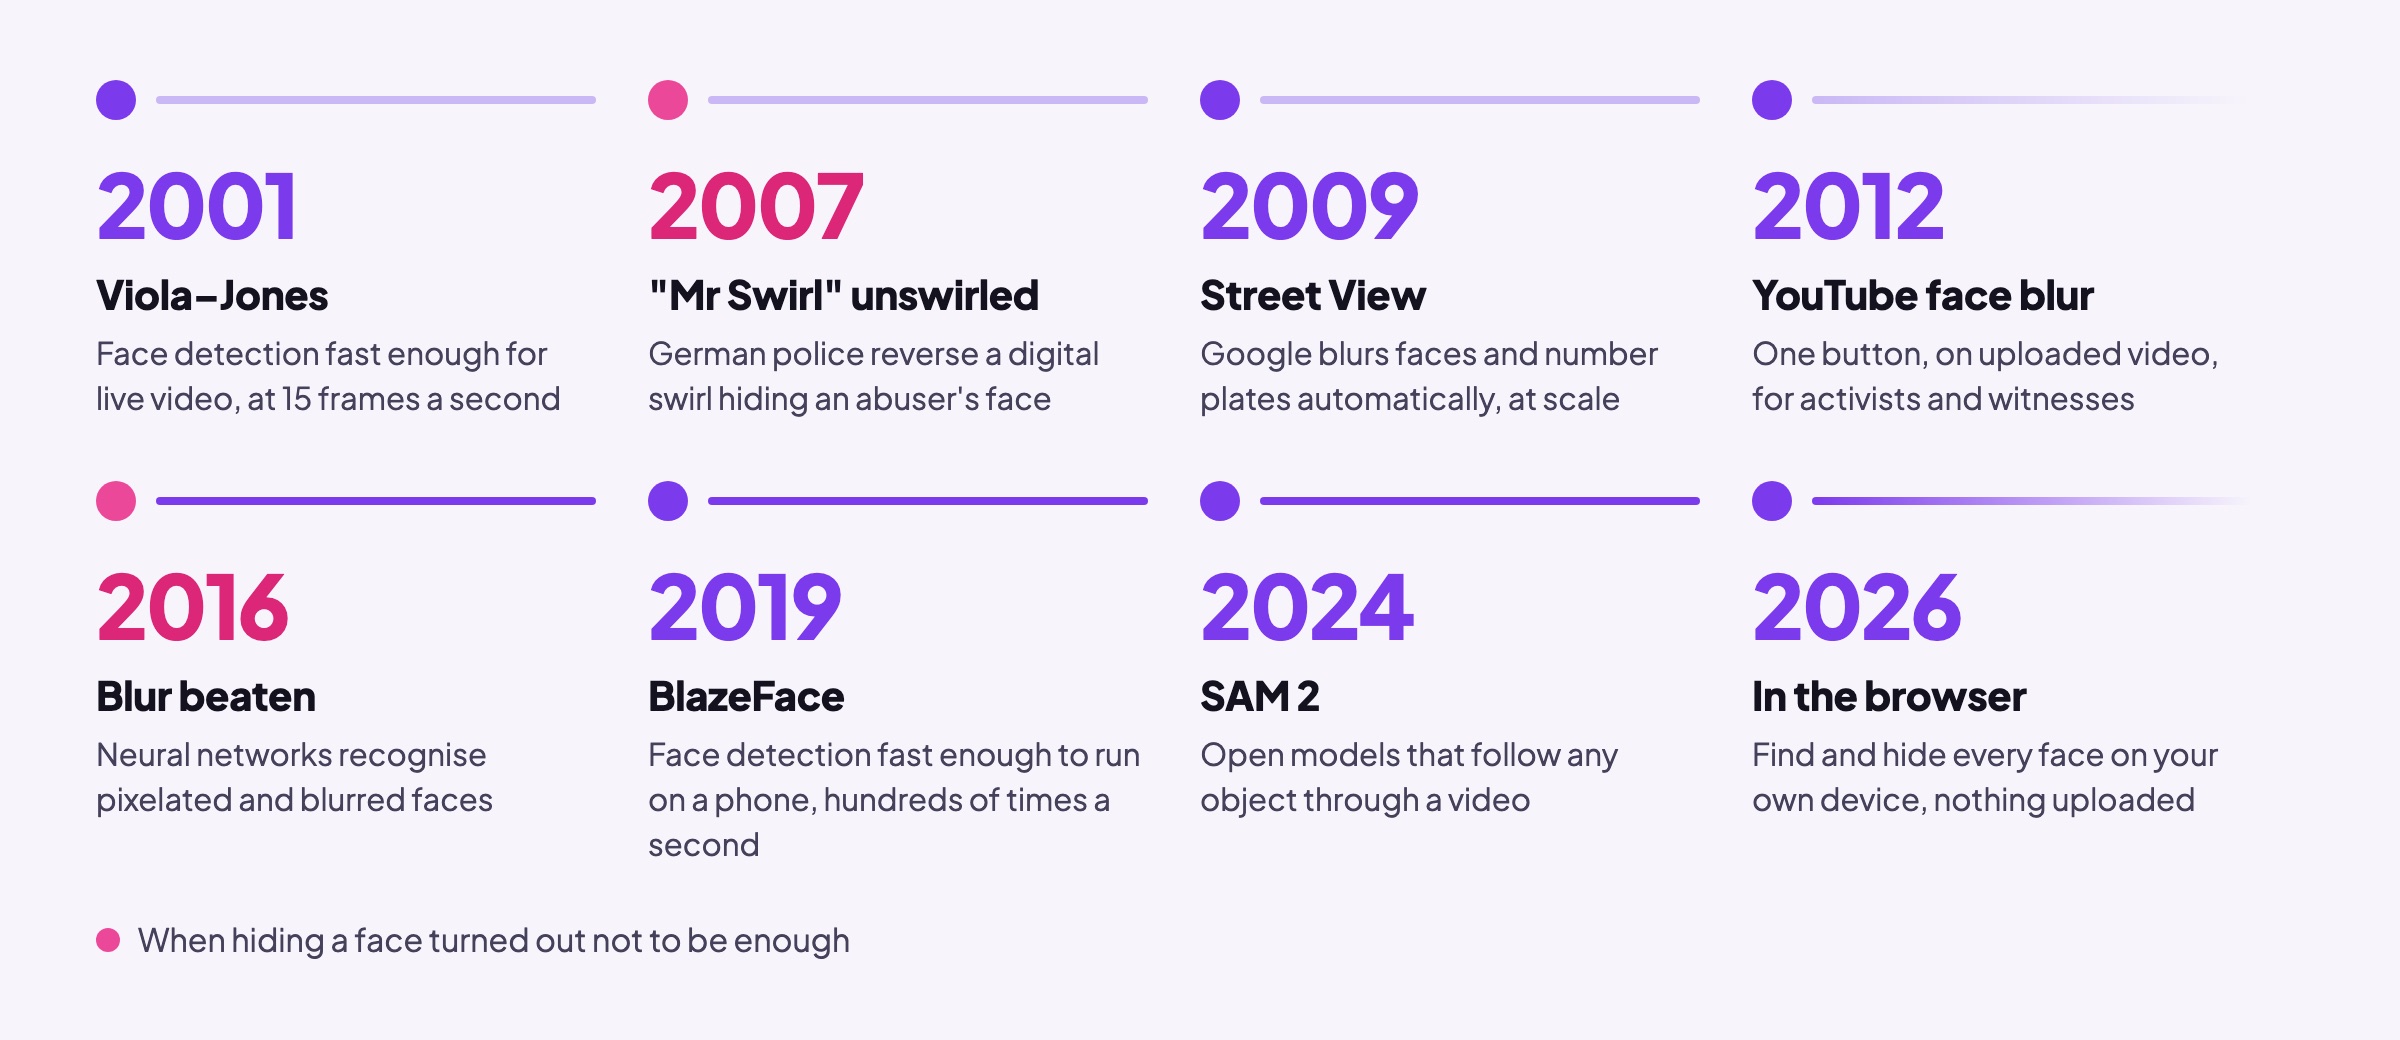
The result is that the hard part of face blurring, finding every face in every frame, is now something a phone or a laptop can do by itself, with open models anyone can use. Which leaves the question of how to hide a face once you’ve found it.
Blur, pixelate, block or emoji: which actually hides a face?
There are four common ways to cover a face, and they’re not equally safe.
Swirls and other reversible effects
The cautionary tale here is from 2007. A man had photographed himself abusing children and disguised his face with a digital swirl. Specialists at Germany’s federal criminal police, the BKA, reversed the effect, and Interpol made its first ever public appeal with the reconstructed face. He was identified and arrested within days. A swirl moves pixels around without destroying them, so it can be run backwards. Never use one to hide anyone.
Pixelation
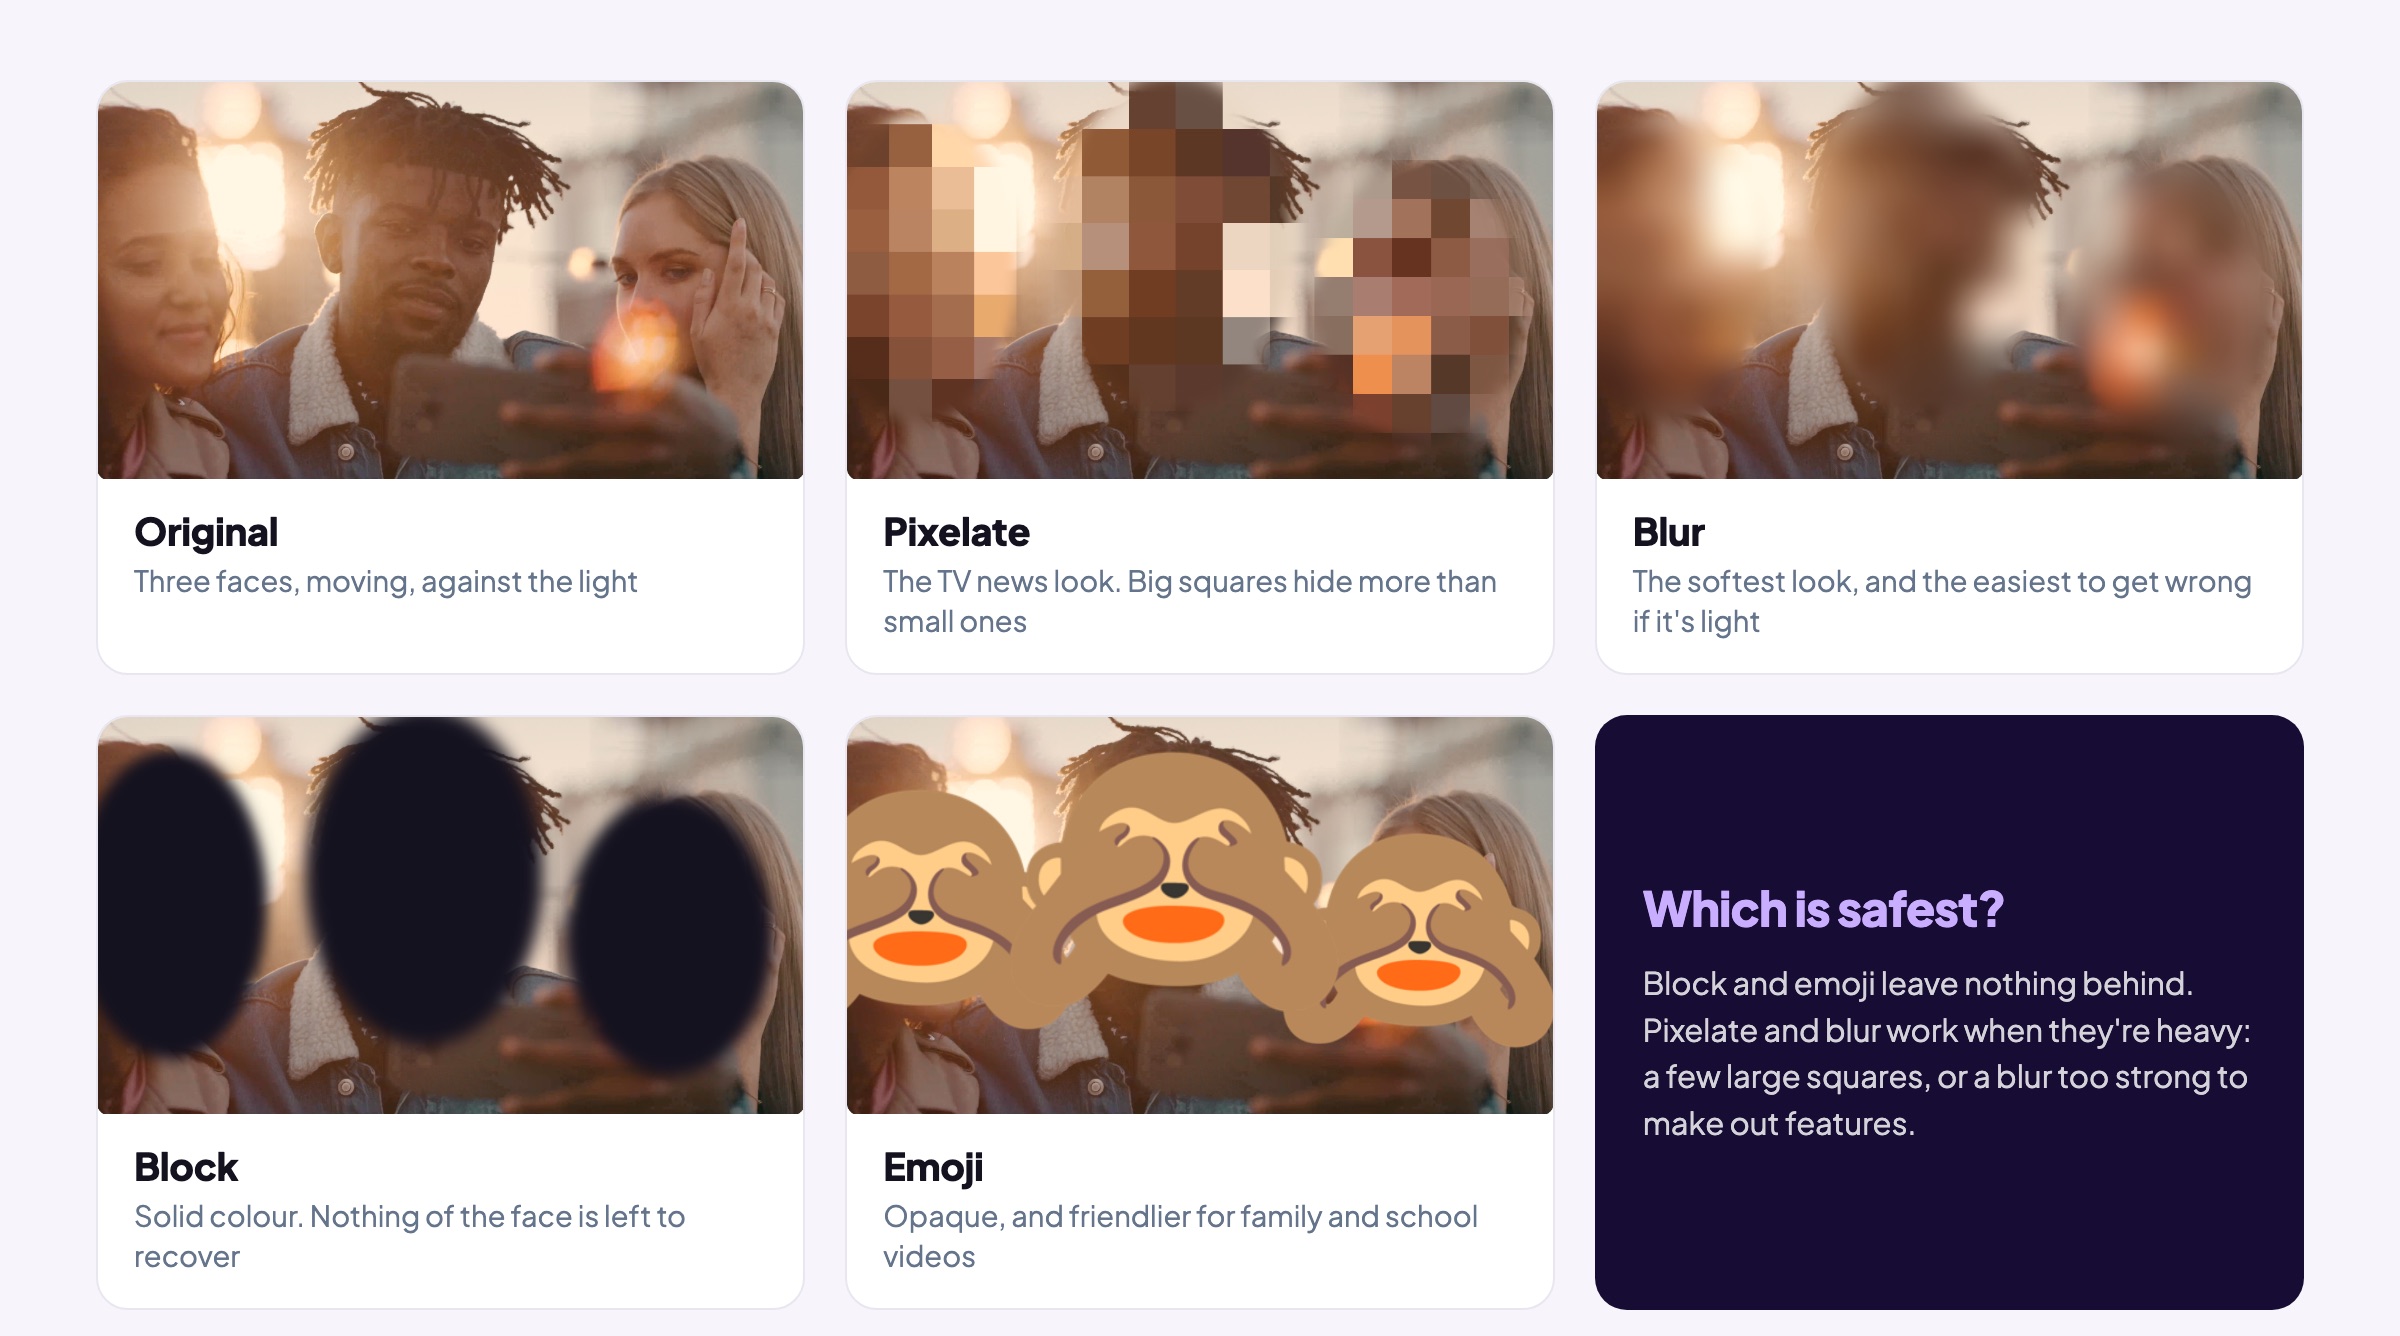
Pixelation replaces a face with a grid of squares, each the average colour of the pixels it covers. It destroys detail, but not all of it, and small squares leave a lot behind. In 2016, researchers at Cornell Tech and the University of Texas showed that a neural network could recognise people from pixelated faces. With a 16×16 pixel mosaic, it picked the right person from 530 people 57% of the time, where guessing would get 0.19%. On a smaller set of 40 people, it beat every mosaic setting they tried more than 95% of the time. There’s an important caveat: the attack picks someone from a set of faces it already knows. It doesn’t rebuild an unknown face. But “is this one of the people we suspect?” is exactly the question a pixelated face is often meant to protect against.
Text is even easier. A separate 2016 study concluded that mosaicing and blurring are not viable ways to redact text, and a free tool called Depix later showed text being recovered from pixelated screenshots. If there’s a name badge, a number plate or a document in your shot, cover it with something solid.
Blur
A blur spreads each pixel’s colour over its neighbours. The same 2016 study beat YouTube’s own face blur too: 57% correct among 40 people, on faces the researchers couldn’t recognise themselves. Interestingly, the BBC’s guidance prefers blurring to pixelation, on the grounds that pixelation can be reversed. The honest summary is that both can leak who someone is when they’re light, and both are safe enough for everyday privacy when they’re heavy: a handful of large squares, or a blur too strong to make out eyes, nose and mouth.
Solid blocks and emoji
Solid blocks and emoji are the only covers that leave nothing to recover, because there’s nothing of the original face left under them. That’s why the ICO mentions “a solid fill to completely obscure” alongside blurring and masking. An emoji is the same idea with a friendlier face, which is why it’s become popular for children’s faces in family and school videos.
Hiding a face isn’t always enough
Whichever cover you choose, remember the BBC’s jigsaw. A person can be recognised by their hair, a tattoo, their clothes, their voice, their car, the house behind them, or the name on their lanyard. A perfectly blurred face above a school uniform with a name tag on it isn’t anonymous. If someone really must not be identified, check everything else in the frame, and consider cutting the shot altogether.
The tools compared
We checked the main tools for blurring faces in video on 25 October 2026, using each company’s own product, help and pricing pages. Prices change often, so treat these as a snapshot.
| Tool | Finds faces for you? | Your video | Free version | Paid |
|---|---|---|---|---|
| Oh So VideoBlur faces | AutomaticEvery face | No uploadRuns in your browser | Free, no watermark, no account | Free |
| Online | ||||
| YouTube StudioFace blur | AutomaticYou pick which | UploadsIt must be on YouTube | Free | Free |
| Kapwing | AutomaticBy AI prompt | Uploads | Watermark, 720p, 4-minute exports | From $16/month |
| BlurMe | Automatic | Uploads | Watermark, 10-second videos | From £5.50/monthBilled yearly |
| Vidio.ai | Automatic | Uploads | Blurs only the first 15 seconds | Not published |
| CapCut | PartlyA tracked mask; a face mosaic effect on desktop | UploadsIn the online editor | Free; Pro features extra | Pro subscription |
| Flixier | By handFace detection for one person only | Uploads | Watermark, 720p | From £15/month |
| VEED | By hand | Uploads | Watermark | Subscription |
| Desktop apps | ||||
| Filmora | AutomaticAI Face Mosaic | No uploadDesktop app | Watermark | From $59.99/year |
| Premiere Pro | PartlyOne click per person, in beta | No uploadDesktop app | Trial only | About $264/year |
| Final Cut Pro | PartlyShows faces; you place each blur | No uploadMac and iPad | Trial only | $299.99 onceOn Mac |
| DaVinci Resolve | PartlyMagic Mask, in the paid Studio | No uploadDesktop app | Free, tracking by hand | Studio $295 once |
| Professional redaction | ||||
| Secure Redact | Automatic | UploadsCloud service | 10-minute trial | From $65/monthBilled yearly |
A few things stand out.
Almost every online tool uploads your video
Their own instructions say so: “upload your video”, “Upload Video”, drag it in. That’s how most web software works: the processing happens on the company’s computers. For a holiday clip it may not matter. For CCTV, a classroom, or footage of someone who needs protecting, sending the unblurred original to a third party is the very thing you were trying to avoid, and it can mean that company becomes a processor of personal data you’re responsible for.
Free usually means watermarked, short or small
Kapwing, BlurMe, Flixier, VEED and Filmora’s free versions all add a watermark; others cap the length at 10 or 15 seconds, or the picture at 720p.
“Automatic” often isn’t
Plenty of pages promise to “blur faces automatically”, then their own steps tell you to drag a box over the face and press track. Genuinely automatic detection, where the tool finds every face for you, is offered by YouTube, Kapwing (if you describe what to blur), BlurMe, Vidio, Filmora and the professional redaction services. Two well-known names, Canva and Clipchamp, have no face blur for video at all.
Desktop editors are the most precise, and the most expensive
If you’re cutting a documentary, Premiere, Final Cut or Resolve give you complete control over every frame. They cost from about $60 a year to $300 up front, and they need the skills to match.
YouTube’s tool is free but only works on YouTube
The video has to be uploaded to your channel first, it works only on a computer, and to get a blurred copy for anywhere else you have to download it again.
Professional redaction is in a different league
Services like Secure Redact, Sighthound Redactor and CaseGuard, built for police forces and legal teams, cost from about $65 to several hundred dollars a month, with audit trails and bulk processing to match. Some, like Sighthound and Gallio PRO, can run on an organisation’s own computers rather than in the cloud.
Tools that don’t upload your video
We’re not the only tool that works without uploading, and it’s worth saying so. ArtPlayer’s face blur and AnonymizeVideo also process video in the browser. What we set out to offer is the whole combination: every face found automatically, nothing uploaded, no watermark, no account, and free.
How we built ours
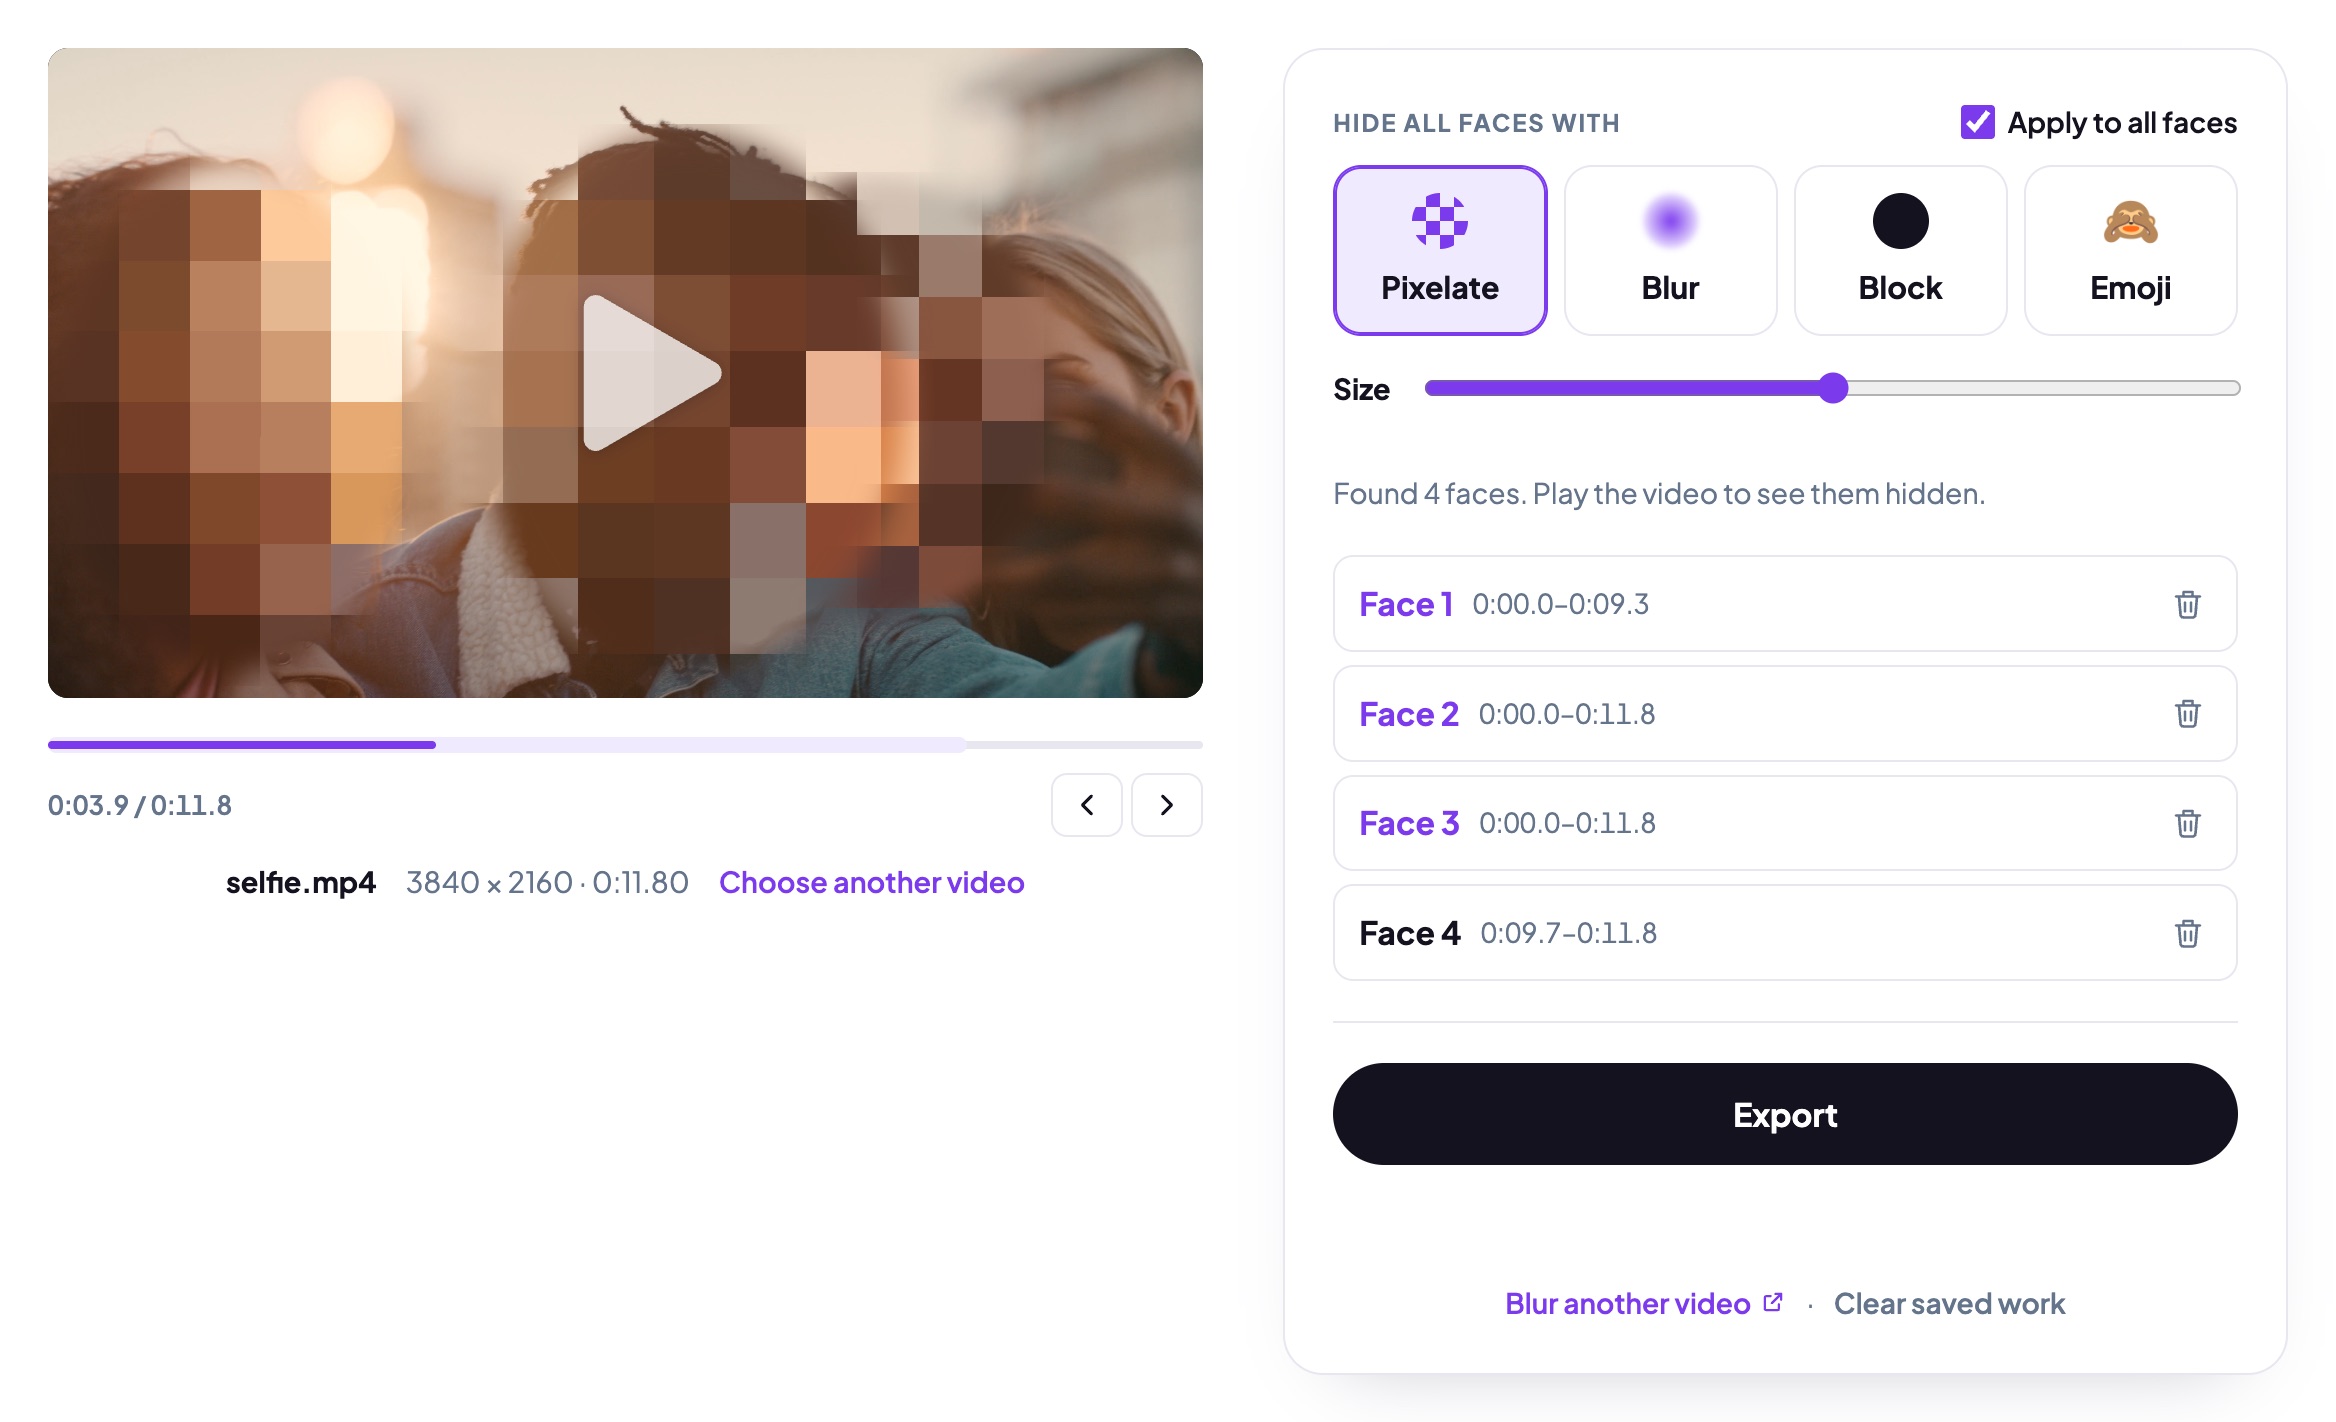
Our Blur faces tool runs entirely in your browser. Choose a video, and the faces start appearing in a list within seconds, each with a cover over it in the preview. You can play the video while it’s still working, change the look (pixelate, blur, block or emoji), make the covers bigger or smaller, and take the blur off anyone who’s happy to be seen. Export makes an MP4 with the covers drawn into every frame.
We won’t publish the recipe, but here’s the shape of it, and the problems that turned out to matter.
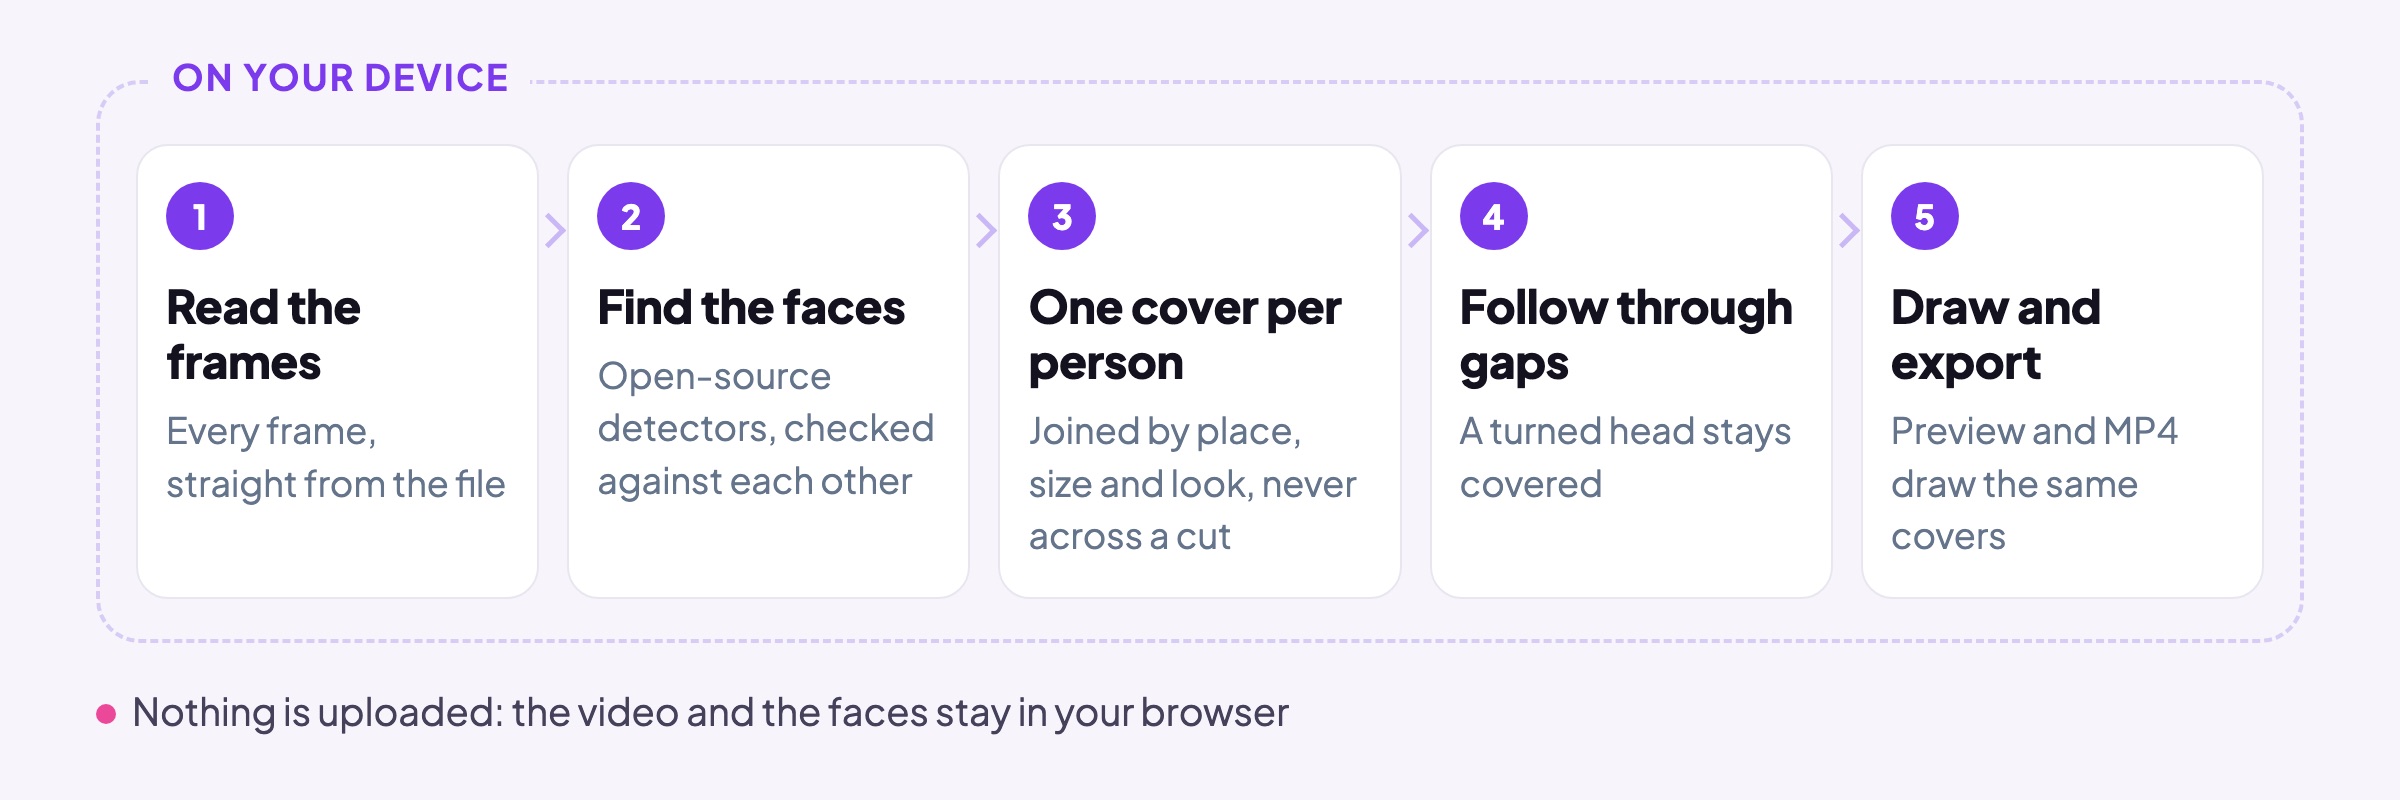
Finding faces is the easy part
Open-source face detectors are good now, and they run in a browser on the device’s own processor. The hard part is everything after.
One person, one cover
A detector looks at each frame on its own, with no idea that the face in frame 200 is the same one as in frame 199. Our first version took its findings too literally, and one person talking to the camera could end up with five overlapping covers, growing and shrinking as the detector’s guesses changed. Now each sighting is matched to a person by where it is, how big it is and what it looks like, so two people sitting cheek to cheek don’t swap covers, and the size of a cover changes smoothly rather than jumping.
Faces that disappear
Real footage is full of moments when no detector can see a face: someone turns away, puts a hand up, steps into shadow, or the camera swings. If the cover vanished every time, the face would flash into view. So the tool follows each face through those gaps and keeps it covered.
Scene cuts
A cover that carries on for a frame or two after a cut lands on the wrong part of the next shot, and a cover for a face in the next shot can appear a moment early. The tool finds every cut and never lets a cover cross one.
Things that aren’t faces
A hand, a shadow or a pattern on a T-shirt can look like a face for a fraction of a second. Brief, unsure sightings are dropped, so the covers stay on people.
The preview has to tell the truth
We found that Chrome shows some phone videos’ frames a tenth of a second earlier than the file says they should appear. That’s enough to put a cover below a face on a bouncing handheld shot. The tool measures each video and corrects for it, so what you see in the preview is exactly what you get in the export.
How we test it
We test it on a bench of clips where every face has been checked by hand, including real phone footage with children, crowds and backlit faces, and in Chrome, Safari and Firefox, and on an iPhone. On a Mac it works through roughly a second of video a second; a recent iPhone takes about twice as long.
It isn’t perfect, and no automatic tool is. A face that’s tiny, side-on and in deep shadow can still be missed for a moment. So play your video through before you share it, and if a face shows, make the covers a little bigger with the Size slider.
How to blur faces in a video, step by step
Here’s the whole job with our tool. It works the same on a computer, a phone or a tablet, in Chrome, Safari, Edge or Firefox.
- Open Blur faces and choose your video. MP4, MOV, WebM and MKV all work, including the videos phones record (Firefox can’t read the HEVC format iPhones use by default, so use Safari or Chrome for those). The file is read where it is, on your device.
- Wait for the faces. They’re listed as they’re found, with the time each one appears, and the preview shows every face covered. You can play the video straight away.
- Pick a look. Pixelate, blur, block or emoji, and the Size slider to make every cover bigger or smaller. With “Apply to all faces” ticked, they all change together.
- Change one face on its own, if you need to. Click a face in the list to give it its own look or size, or press its bin button to take its cover off. Someone who’s happy to be seen, the person filming or the subject of the video, can stay visible while everyone else is hidden.
- Play it through, then Export. Watch the whole thing once. Export saves an MP4 with the covers drawn into every frame, at the video’s own size where your browser can make it, with the sound kept.
On a phone, keep the page open while it works: phones pause pages that aren’t on screen. Long videos take longer, so for anything more than a few minutes, a computer is quickest.
If you close the tab by mistake, or your phone closes it to free memory, the faces found so far and any changes you’ve made are kept on your device, and the tool picks up where it stopped when you open it again.
A checklist before you share
- Choose a strong cover. For anyone who really must not be identified, use a solid block or an emoji. If you prefer blur or pixelation, make it heavy.
- Watch the whole video. Automatic tools miss faces at awkward moments: turning, in shadow, at the edge of the frame, or for a split second after a cut.
- Look beyond the face. Name badges, uniforms, tattoos, number plates, house numbers and screens can all identify someone. Hair and voices can too.
- Never use a swirl or a light blur. If you can still make out features, so can software.
- Cut what you don’t need. It’s often easier to trim the video to the part that matters than to hide everyone in it.
- Think about where the original goes. Blurring a video on someone else’s servers means the unblurred version went there first.
- Keep the original private. The blurred copy is safe to share; the original isn’t. Store it carefully, or delete it if you don’t need it.
When you’re done, if the file is too big to send, you can compress it the same way, on your own device.
Hiding faces used to be a job for specialists with expensive software and an afternoon to spare. Now the software can find every face in seconds. The judgement about what to hide, and how thoroughly, is still yours.
Frequently asked questions
How do I blur faces in a video?
Open a face blur tool that finds faces for you, choose your video, and let it find every face. Pick a cover (pixelate, blur, a solid block or an emoji), take the cover off anyone who’s happy to be seen, play the video through to check nothing was missed, then export. With Oh So Video’s Blur faces tool, all of that happens in your browser and the video is never uploaded.
Can I blur faces in a video for free, without a watermark?
Yes. Oh So Video’s Blur faces tool is free, adds no watermark and needs no account. YouTube Studio’s face blur is also free, but only works on videos already uploaded to your YouTube channel. Most other online tools add a watermark to free exports or limit the length or picture size.
Is it safe to blur faces with an online tool?
It depends on where the video goes. Most online face blur tools upload the original, unblurred video to their servers to process it, which defeats the point for sensitive footage such as CCTV, classrooms or anyone who needs protecting. Tools that work in your browser, like ours, or desktop apps keep the original on your device.
Can a blurred or pixelated face be unblurred?
A light blur or small pixelation can leak who someone is: researchers in 2016 trained software to pick out people from pixelated and blurred faces, given photos of who they might be, and a digital swirl was reversed by police in 2007. A heavy blur or large pixel squares are enough for everyday privacy. A solid block or an emoji leaves nothing to recover, so use one for anyone who really must not be identified.
How do I blur faces in a video on an iPhone or Android phone?
You don’t need an app. Open Oh So Video’s Blur faces tool in Safari or Chrome on the phone, choose the video from your library, and it finds and covers the faces on the phone itself. Keep the page open while it works, since phones pause pages that aren’t on screen.